Contents:
- Why Garden Layout Matters More Than Plant Choice
- Understanding Your Garden’s Baseline: Site Analysis
- Sun Exposure and USDA Hardiness Zones
- Soil Testing: The $15 Investment That Saves Hundreds
- Core Flower Garden Layout Design Principles
- The Rule of Three and Odd-Number Groupings
- Layering by Height: Front, Middle, Back
- Spacing for Health and Visual Density
- Repetition and Rhythm
- Color Theory Applied to Flower Beds
- Complementary Color Schemes
- Analogous and Monochromatic Planting
- Foliage as the Unsung Hero
- Designing for Continuous Bloom: The Succession Planting Strategy
- The “Bulb Lasagna” Technique
- Practical Layout Formats: Which Shape Suits Your Space
- Island Beds
- Border Beds Against Structures
- Cottage Garden Style
- Formal Geometric Designs
- Eco-Friendly Design: Building a Garden That Gives Back
- Native Plants as the Foundation
- Designing for Pollinators
- Water-Smart Layout Techniques
- A Reader Story: The $200 Backyard Transformation
- Practical Tips for Budget-Conscious Gardeners
- Where to Source Plants for Less
- Hardscape on a Budget
- Maintaining Your Layout Over Time
- Common Flower Garden Layout Design Mistakes to Avoid
- Frequently Asked Questions About Flower Garden Layout Design
- What is the best flower garden layout for beginners?
- How do I plan a flower garden layout on a budget?
- How far apart should flowers be planted in a garden bed?
- How do I design a flower bed for year-round interest?
- What is the best shape for a flower garden bed?
- Planning Your First Season: A Practical Starting Point
In 1621, the Pilgrim colonists at Plymouth didn’t just plant crops — they planted flowers. Historical records show ornamental blooms growing alongside corn and beans, not because the settlers had extra seeds, but because they understood something profound: a well-arranged garden feeds more than the body. That instinct to organize beauty with intention is exactly what separates a stunning flower garden from a chaotic one. And it all starts with layout and design.
Today, thoughtful flower garden layout design is equal parts art and applied science. It draws on principles of color theory, plant biology, soil chemistry, and spatial geometry — yet the best gardens are made by ordinary people with modest budgets and a willingness to learn. This guide covers everything from foundational concepts to the specific measurements and techniques that professional landscape designers use, translated into approachable language for anyone starting with a patch of dirt and a bag of bulbs.
Why Garden Layout Matters More Than Plant Choice
Most beginner gardeners spend 90% of their planning time choosing which flowers to grow and almost no time thinking about where to place them. This is the single biggest mistake in home garden design. A breathtaking peony surrounded by poorly chosen neighbors at the wrong height can look awkward and even die prematurely from competition. Meanwhile, a humble marigold placed strategically at a border edge can anchor an entire bed with confidence.
Layout governs light exposure, air circulation, root competition, drainage, and visual harmony all at once. A study from the Royal Horticultural Society found that gardens designed with deliberate spatial planning required up to 30% less maintenance over a three-year period than those planted without structure. Less weeding, fewer pest problems, and more consistent blooms — all from better upfront planning.
Good design also maximizes your budget. When you know your layout before you buy, you purchase only what you need, place each plant correctly the first time, and avoid costly replacements from failed trial-and-error planting.
Understanding Your Garden’s Baseline: Site Analysis
Before drawing a single sketch, spend two weeks observing your intended planting area at different times of day. This isn’t overthinking — it’s data collection. You need to know how many hours of direct sun the space receives, where water pools after rain, which areas dry out fastest, and which directions the dominant winds come from.
Sun Exposure and USDA Hardiness Zones
In the US, plants are rated by USDA Plant Hardiness Zones, a map based on average annual minimum temperatures. Zones range from 1 (Alaska, coldest) to 13 (southernmost Hawaii and Puerto Rico). Most continental US gardeners fall between Zones 4 and 9. Your zone determines which perennials will survive winter and which must be treated as annuals.
Beyond zone, categorize your site by sun exposure:
- Full sun: 6 or more hours of direct sunlight daily (roses, lavender, coneflowers)
- Partial sun/shade: 3–6 hours (astilbe, coral bells, impatiens)
- Full shade: fewer than 3 hours (hostas, bleeding heart, ferns)
Choosing plants that match your actual light conditions — not the light conditions you wish you had — is the single most reliable predictor of garden success.
Soil Testing: The $15 Investment That Saves Hundreds
Home soil test kits available at garden centers for $10–$20 measure pH, nitrogen, phosphorus, and potassium. Most flowering plants prefer a slightly acidic to neutral pH of 6.0–7.0. Rhododendrons and azaleas want pH as low as 4.5–5.5, while clematis prefers 7.0–7.5. Planting in incompatible soil means your flowers will struggle regardless of how well you design the layout.
Your local Cooperative Extension Service (a USDA-affiliated network with offices in every US county) often offers free or low-cost soil testing with detailed amendment recommendations. This is one of the most underused free resources available to American gardeners.
Core Flower Garden Layout Design Principles
Professional garden designers use a consistent set of spatial and visual principles. You don’t need a degree to apply them — you need to understand the logic behind each one.
The Rule of Three and Odd-Number Groupings
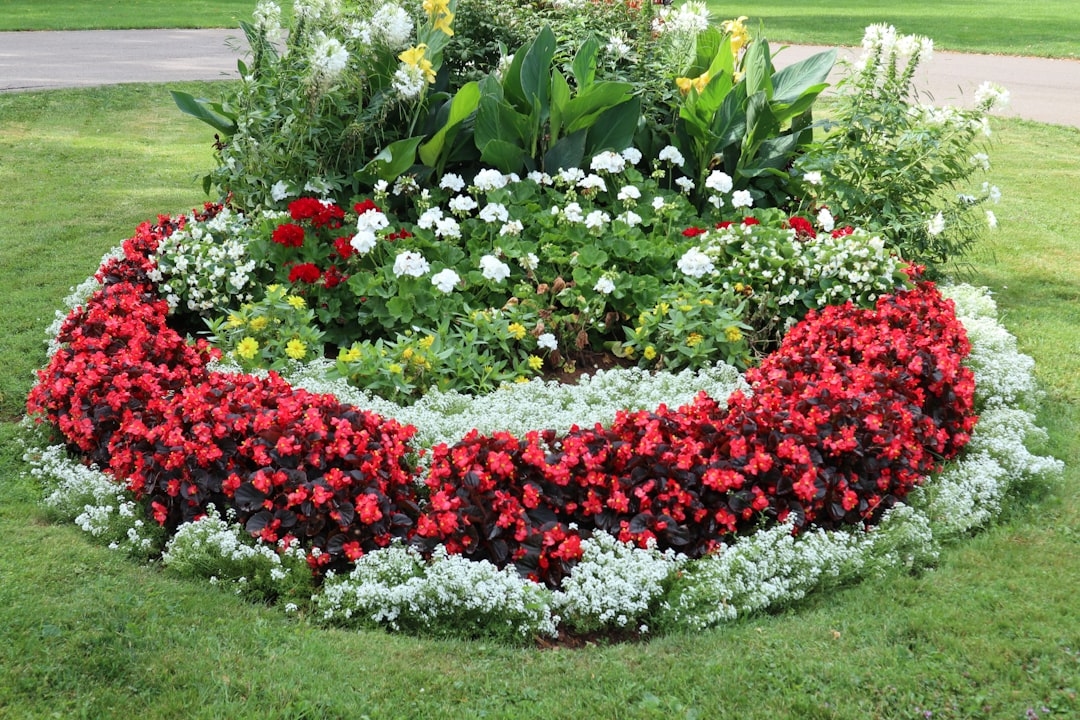
Planting in odd numbers — 3, 5, 7 — creates naturalistic clusters that read as cohesive masses rather than rows of individual plants. A single salvia looks lonely. Three salvias look intentional. Seven look like a sweeping drift of color. This technique mirrors how plants grow in the wild and tricks the eye into perceiving abundance even in small spaces.
For a 4-foot-wide border bed, a grouping of 3 medium perennials (18-inch spread each) fits comfortably with natural spacing. In a 10-foot island bed, a central mass of 5–7 tall plants anchors the design.
Layering by Height: Front, Middle, Back
Successful beds are designed in three height tiers. Short plants (under 12 inches) go at the front or edges — think alyssum, pansies, or creeping phlox. Medium plants (12–36 inches) fill the middle — daylilies, salvia, yarrow. Tall plants (over 36 inches) anchor the back — hollyhocks, delphiniums, ornamental grasses.
For island beds viewed from all sides, reverse this: tall plants in the center, decreasing in height toward all edges. This “wedding cake” structure ensures every plant is visible and the bed looks intentional from any angle.
A common rookie error: placing tall plants mid-border because they’re beautiful, then realizing they block everything behind them. Measure plant tags carefully. A delphinium listed as “3–4 feet” can easily reach 5–6 feet in a fertile, well-watered bed.
Spacing for Health and Visual Density
Plant tags list spacing recommendations, but these are often written for maximum mature spread — leaving gaps that look sparse for the first 1–2 years. Many experienced gardeners plant at 75% of recommended spacing to achieve a fuller look faster. The trade-off: more vigilant division every 2–3 years to prevent overcrowding.
A budget-friendly technique: start with 75% spacing using divisions from friends, neighbors, or plant swaps (common in most US gardening communities), then divide and fill as plants mature. You can grow an entire 100-square-foot border for under $50 this way.
Repetition and Rhythm
Repeating the same plant or color at intervals of 4–6 feet throughout a border creates visual rhythm — the sense that the garden has an internal logic. Plant designers call this “threading.” Running a repeat of purple salvia every 5 feet along a 20-foot border, for example, ties together whatever other colors sit between them. Without repetition, a border can feel chaotic even with beautiful individual plants.
Color Theory Applied to Flower Beds
Color is where many gardeners feel intimidated, but the rules of color theory translate directly from painting to planting. The basic color wheel — and understanding complementary, analogous, and monochromatic schemes — gives you a reliable framework.
Complementary Color Schemes
Complementary colors sit opposite each other on the color wheel: purple and yellow, orange and blue, red and green. Pairing purple salvia with yellow rudbeckia (black-eyed Susan) creates high-contrast drama that’s visually arresting. This combination also happens to bloom simultaneously in late summer across most of USDA Zones 4–8, making it a practical and beautiful pairing.
Analogous and Monochromatic Planting
Analogous schemes use colors adjacent on the wheel — orange, yellow, and red-orange — for a warm, cohesive feel. Monochromatic schemes use a single color in varying shades and textures, such as a white garden (made famous by Vita Sackville-West’s White Garden at Sissinghurst in England) or an all-blue border. These schemes are more sophisticated and harder to execute well, but they create an unmistakable sense of calm and intentionality.
For budget gardeners: white and pale yellow flowers are often available as seed packets for $2–$4 and can fill large areas cheaply. A monochromatic white-and-cream border with varied textures — spiky echinacea, soft gypsophila, round allium — looks expensive while being remarkably affordable.
Foliage as the Unsung Hero
Flowers bloom for 2–6 weeks. Foliage is present for the entire growing season. Incorporating plants with interesting leaf color, texture, or shape — silvery artemisia, burgundy coral bells (Heuchera), golden creeping Jenny — ensures the bed looks composed even between bloom periods. Good foliage can contribute up to 70% of a bed’s visual appeal during the long non-blooming gaps of spring and fall.
Designing for Continuous Bloom: The Succession Planting Strategy
A common frustration: a gorgeous June garden that looks like a parking lot in August. Succession planting solves this by layering plants with different bloom times so something is always in flower from early spring through first frost.
Map your bloom calendar before planting. In Zone 6, for example:
- Early spring (March–April): tulips, daffodils, pansies, bleeding heart
- Late spring (May–June): irises, peonies, allium, catmint
- Summer (July–August): coneflower, black-eyed Susan, daylily, phlox
- Late summer–fall (September–October): sedum ‘Autumn Joy’, asters, ornamental grasses, rudbeckia
Aim for at least one representative from each seasonal tier in every bed. A 50-square-foot border can realistically host 8–12 species, giving you blooms for 6–7 months without any single week looking bare.
The “Bulb Lasagna” Technique
For small beds where space is at a premium, layer spring bulbs in tiers underground. Plant large, late-blooming tulip bulbs at 8 inches deep, medium daffodils at 6 inches above them, and small early crocuses at 3 inches. As the season progresses, each layer emerges and blooms in sequence, tripling your spring display per square foot of ground.
Practical Layout Formats: Which Shape Suits Your Space
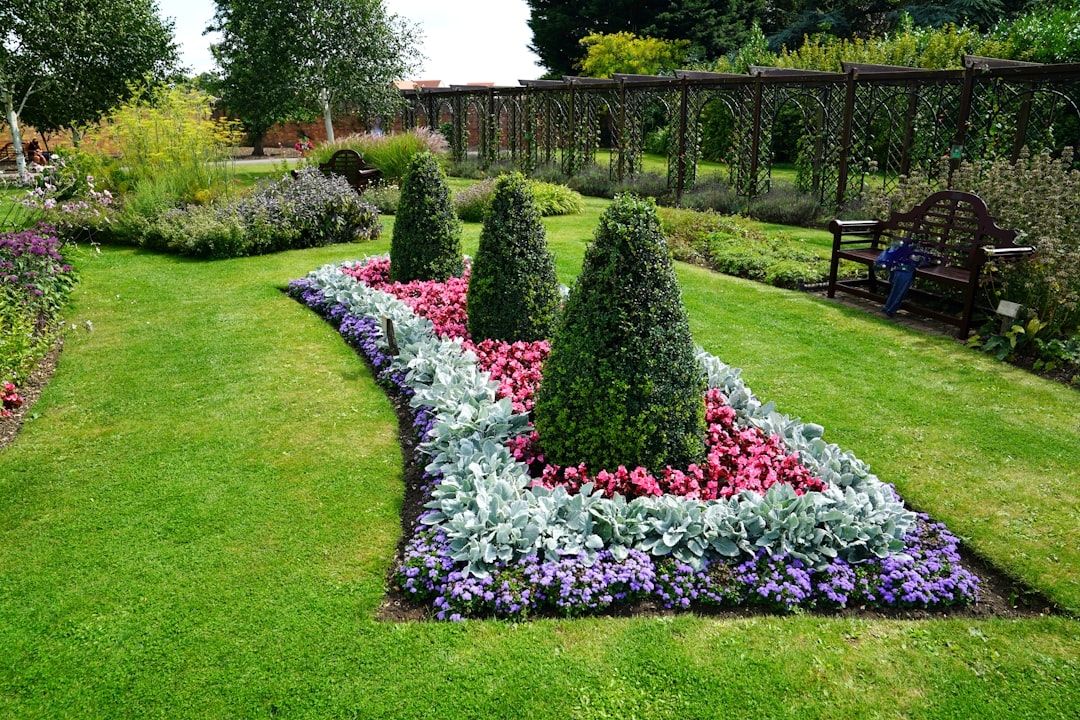
Island Beds
Island beds are freestanding, accessible from all sides, and typically oval or kidney-shaped. The ideal width is no more than 6 feet — allowing you to reach the center from either side without stepping on the soil. A 6-by-12-foot island bed provides 72 square feet of planting area and can comfortably hold 25–35 perennials at standard spacing.
Border Beds Against Structures
Borders run along fences, walls, hedges, or the edge of a lawn. The classic English border is 8–12 feet deep and 20–30 feet long, but a 4-foot-deep border works beautifully for most American home gardens and is much easier to maintain. Anything deeper than 6 feet requires stepping stones or access paths to reach the back without compacting soil.
Cottage Garden Style
The cottage garden layout deliberately rejects rigid structure in favor of controlled abundance. Plants are allowed to self-seed and sprawl within loose boundaries. Key to making this work: an underlying structure of repeat plants and a limited color palette. Without these constraints, “controlled abundance” becomes “weedy chaos.” Choose 3–5 main plants that you allow to naturalize — cosmos, foxglove, larkspur, sweet alyssum, calendula — and let them fill in around more permanent perennials.
Formal Geometric Designs
Formal gardens use symmetry, straight lines, and geometric shapes (rectangles, circles, knot patterns). They require more maintenance but project a sense of order and grandeur. Low hedges of boxwood or lavender define beds. This style suits front yards and formal entry gardens. Budget note: formal designs often need fewer plant varieties but more of each, which actually reduces per-plant cost when buying in flats.
Eco-Friendly Design: Building a Garden That Gives Back
A thoughtfully designed flower garden can do more than look beautiful — it can actively support local ecosystems, reduce water consumption, and decrease your dependence on chemical inputs. These aren’t idealistic goals; they’re achievable with specific design choices that often cost less than conventional approaches.
Native Plants as the Foundation
Native flowering plants — those indigenous to your specific region before European settlement — require dramatically less water, fertilizer, and pest management than exotic ornamentals. Eastern purple coneflower (Echinacea purpurea), native across much of the eastern US, thrives in poor soil, tolerates drought once established, and provides critical food for monarch butterflies and native bees. A bed composed of 50–70% native species can reduce supplemental watering by up to 50% compared to a conventional planting.
The Lady Bird Johnson Wildflower Center’s Native Plant Database (wildflower.org) allows you to search by zip code for regionally appropriate natives. This free tool is invaluable for building a regionally appropriate plant palette.
Designing for Pollinators
Pollinator-friendly design follows a few specific rules. Plant in blocks rather than single specimens — a 3-by-3-foot mass of a single species is far more useful to bees than the same number of plants scattered individually. Include plants with overlapping bloom times to provide continuous forage. Avoid double-flowered cultivars (roses, dahlias, peonies labeled as “double”) where possible — their extra petals often make nectar and pollen inaccessible to insects.
A well-designed pollinator border can support 50–60 species of native bees and beneficial insects. Studies from the Xerces Society show that even a 100-square-foot garden planted with the right species can measurably increase pollinator populations in a neighborhood.
Water-Smart Layout Techniques
Group plants by water needs in a technique called “hydrozoning.” Drought-tolerant species (lavender, sedum, rudbeckia) go together; moisture-lovers (astilbe, cardinal flower, Joe-Pye weed) get their own zone. This prevents overwatering drought-tolerant plants and underwatering thirsty ones — one of the most common causes of plant loss in home gardens.
Adding 2–3 inches of organic mulch (shredded bark, wood chips, or straw) reduces soil moisture evaporation by 25–50%, dramatically reducing irrigation needs. A 100-square-foot bed needs roughly 3 cubic feet of mulch — about $8–$15 worth of bagged mulch, or free if you contact your local arborist or municipal composting program.
🌿 What the Pros Know
Professional landscape designers rarely plant for the first year. They design for Year 3. When sketching your layout, leave 20% more space than plant tags recommend for fast-spreading perennials like coneflower, black-eyed Susan, and ornamental grasses. What looks sparse in spring of Year 1 will be perfectly filled by fall of Year 2 — and won’t need emergency division by Year 3. Label this extra space “mulch now, fill later” in your plan and resist the urge to over-plant it with annuals.
A Reader Story: The $200 Backyard Transformation
Sarah, a teacher in suburban Ohio (Zone 6a), spent three summers frustrated with her 8-by-20-foot backyard border. She’d buy whatever looked good at the nursery in May, jam it in wherever there was space, and end up with a jumbled collection of plants that bloomed for two weeks and looked tired for the other fourteen. “I was spending $150–$200 every spring and getting nothing I was proud of,” she said.
The following year, she changed her approach entirely. In February, she drew her bed to scale on graph paper, assigned height tiers, mapped a bloom calendar, and chose a limited palette of purple, white, and silver. She ordered seeds online for $18 total — cosmos, larkspur, and sweet alyssum — and bought just 9 perennials from a local native plant sale at $4 each. She filled gaps with the seeds.
By August, her border was the most-photographed spot in her neighborhood. Total cost: $72. The perennials return each year. The self-seeding annuals come back for free. Her layout did the heavy lifting — not the plants themselves, and certainly not the price tag.
Sarah’s experience illustrates a truth that professional designers know well: structure and planning are worth more than expensive plants. A well-designed layout transforms ordinary, affordable plants into something that looks curated and intentional.
Practical Tips for Budget-Conscious Gardeners
Where to Source Plants for Less
- Native plant sales: Many botanical gardens, conservation districts, and native plant societies hold annual sales in April–May with regional species for $3–$6 each — a fraction of nursery prices.
- Seed starting: Starting from seed costs $0.10–$0.50 per plant vs. $4–$12 per nursery transplant. Cosmos, zinnias, marigolds, larkspur, and bachelor’s buttons all germinate reliably indoors under a $20–$30 grow light.
- Division exchanges: Facebook Marketplace, Nextdoor, and local garden clubs regularly feature free or very cheap divisions of overgrown perennials. Hostas, daylilies, and irises are almost always available.
- End-of-season sales: Garden centers discount perennials by 50–75% in late August and September. These “distressed” plants establish roots over fall and emerge healthy in spring.
Hardscape on a Budget
Edging, paths, and borders define a garden’s structure even when plants are still establishing. You don’t need expensive stone or brick. Reclaimed lumber, concrete landscape edging ($10–$20 per 20-foot roll), or even a crisp mowing edge cut with a half-moon edger ($15–$25) gives beds a finished, professional look for minimal investment. Stepping stones can be poured concrete pavers at $1.50–$2 each — laid in a simple offset pattern, they look far more expensive than they are.
Maintaining Your Layout Over Time
A garden layout is a living document, not a permanent blueprint. Take photos every 4–6 weeks throughout the growing season and review them at the end of the year. Note what was too tall, too short, bloomed at the wrong time, or spread beyond its allocated space. Move plants in fall (for most perennials) or very early spring before growth begins. Perennials tolerate transplanting remarkably well when moved at the right time — a clump of coneflowers can be dug and relocated in October with minimal stress to the plant.
Common Flower Garden Layout Design Mistakes to Avoid
- Ignoring mature size: A dwarf butterfly bush labeled “3 feet” can reach 6–8 feet in Zones 5–9. Always research mature dimensions from multiple sources, not just the nursery tag.
- Monotone bloom timing: Designing for a spectacular June peak that leaves a brown August. Map your bloom calendar before you buy a single plant.
- Forgetting negative space: Crowding every inch with plants removes the visual breathing room that makes individual plants stand out. A mulched gap of 12–18 inches between clusters can actually improve the overall appearance.
- Planting tender perennials as if they’re hardy: Salvia nemorosa is cold-hardy to Zone 4; Salvia guaranitica is hardy only to Zone 7. Misreading zone information costs money and disappointment.
- Neglecting vertical structure: Flat beds lack drama. Incorporate at least one vertical element per 20 linear feet — an obelisk with climbing sweet peas, a clump of ornamental grass, or a tall-growing verbena bonariensis.
Frequently Asked Questions About Flower Garden Layout Design
What is the best flower garden layout for beginners?
A simple rectangular border bed, 4 feet deep by 8–12 feet long, is the most manageable layout for beginners. This size is accessible from both sides, easy to plant in defined tiers (front, middle, back), and large enough to hold 12–15 plants for continuous seasonal interest. Start with a mix of 60% reliable perennials and 40% easy annuals to ensure color while the perennials establish.
How do I plan a flower garden layout on a budget?
Draw your plan to scale before purchasing anything. Assign heights and bloom times to each zone, then source plants strategically: seeds for annuals ($2–$4 per packet), native plant sales for perennials ($3–$6 each), and late-season clearance sales for additional fills. A complete 50-square-foot border can be planted for $40–$80 using these strategies. Avoid impulse purchases at full-price nurseries in May — the most expensive way to garden.
How far apart should flowers be planted in a garden bed?
Spacing depends on mature spread, which is listed on most plant tags. As a general rule: small plants under 12 inches (alyssum, pansies) need 6–9 inches; medium plants 12–24 inches tall (coneflower, salvia) need 18–24 inches; large perennials over 24 inches (daylilies, ornamental grasses) need 24–36 inches. Planting at 75% of recommended spacing creates a fuller look faster but requires dividing plants every 2–3 years.
How do I design a flower bed for year-round interest?
Layer plants across four seasonal bloom windows: early spring (bulbs, hellebores), late spring (irises, allium), summer (coneflowers, daylilies), and fall (asters, sedums). Include plants with ornamental seed heads or interesting foliage for winter structure — dried grasses, rudbeckia seed heads, and sedum rosettes remain attractive through January in most US zones. Aim for at least 3 plants representing each seasonal period per bed.
What is the best shape for a flower garden bed?
Curved, organic shapes generally look more naturalistic and are easier to maintain than perfectly geometric ones in informal garden settings. Kidney or teardrop shapes read as intentional without requiring the precision of true geometric forms. The most important measurement is width: no bed should exceed 6 feet without an internal access path, regardless of shape. Wider than 6 feet and you’re stepping on soil to reach the center, compacting roots and undoing careful design.
Planning Your First Season: A Practical Starting Point
The best time to design a flower garden is winter. January and February, when catalogs arrive and seed packets fill the displays at hardware stores, give you three to four months of planning time before the soil is workable. Draw your bed to scale — 1 inch on paper equals 1 foot of ground — and assign each zone a height tier, a bloom time, and a color. Cross-reference your USDA hardiness zone for every plant before committing.
Order seeds in January for the widest selection and lowest prices. Purchase perennials at native plant sales in April–May or during end-of-season clearances in August–September. Set a firm budget before you walk into any nursery — the most beautiful, well-designed gardens are built on discipline and a plan, not on what caught your eye at the checkout line.
Your flower garden layout design will evolve every year. That’s not failure — that’s gardening. The plants will teach you what works. The key is to start with a plan solid enough to learn from, flexible enough to adapt, and grounded in principles that have worked for gardeners across centuries and continents. Sketch it out this winter. Your July self will thank you.
+ There are no comments
Add yours